
Introduction
Palette 2 splices together different materials and feeds them into 3D printers to create objects with multiple colors and materials. Palette uses a combination of heat, compression, and cooling to join these filaments together depending on the materials’ properties. Splices should be (1) strong enough to feed into your extruder without breaking, and (2) have a diameter of approximately 1.75 mm ± 0.1 mm so they feed properly. We recommend using filament that is within +/- 0.03 mm spec of 1.75 mm to create the best quality splices.
Materials require different amounts of heat, compression, and cooling to create good splices.
You can use Materials Profiles to control how much heat, compression, and cooling are used when splicing together different materials. These can be found, created, or adjusted in our CANVAS and Chroma softwares.
CANVAS and Chroma include default values that work for the majority of filaments (like PLA and PETG), but if you are using special filaments like solubles, flexibles, or other exotics, the Splice Tuning feature will help you find the ideal settings so your Palette 2 can create optimal splices.
We also have a video tutorial on how to proceed with the steps below.
Video Overview
-
-
Find a material combination in this chart that is similar to the materials you are using. Use these Heat Factor, Compression Factor and Cooling Factor values as a baseline.
-
-
-
Proceed to Settings > Splice Tuning.
-
Select Next and follow the on-screen instructions. Palette 2 will prompt you to remove the Teflon tubing from the unit to allow easy access to the spliced filament. Once this is done, load the outgoing filament into drive 1 and the ingoing filament into drive 2. Once this is complete, Palette 2 will display the splice tuning screen.
-
This allows you to adjust the following factors:
-
Heat Factor - Each increment of 1 adds an additional 0.5 seconds to the heating time. Note that substantially higher heating times may require more cooling time as well. These increases together may require slower print speeds so it is best not to heat more than is necessary.
-
Compression Factor - Each increment of 1 adds additional compression of 0.5 mm to the splice. Compression pushes the rigid filament into the end of the melted filament to create a strong bond. Reducing compression (by up to 2-3 units) has been found to extend the lifespan of the splice tube.
-
Over-compression can sometimes lead to large splices so you only want to compress as much as is needed to create a strong bond.
-
Cooling Factor - Each increment of 1 adds an additional 2 seconds to the cooling time.
-
Note that substantially higher cooling times may require slower print speeds.
-
-
-
Splicing Order - Note that for some materials, the order with which you splice will affect the splicing parameters. During Splice Tuning, Palette 2 will splice the filament in drive 2 to the end of the filament in drive 1.
-
It is especially important to try splicing with both combinations when using different material types (i.e. TPU and PLA). You can do so by swapping the filaments between the two drives and re-testing the values. If you find different settings dependent on the order, you can input these into CANVAS/Chroma accordingly.
-
Once the values and features are chosen, press 'Splice', and Palette 2 will create one splice between the filaments based on these values. This allows you to check the quality of the splice without having to run a full print.
-
-
-
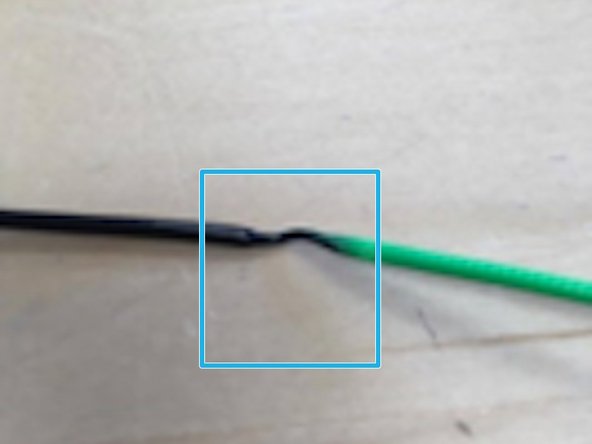
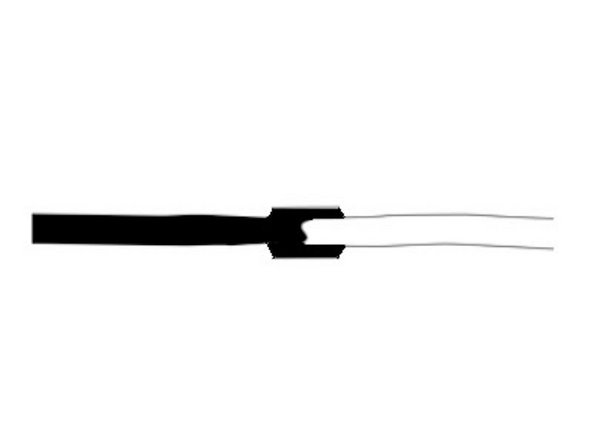
Wait for Palette 2 to create filament and examine the splice. Adjust Heat Factor, Compression Factor, and Cooling Factor to get a good splice as in the first photo.
-
The amount of time the splice core spends heating and cooling filament can dictate your splice quality. The most common issues you may experience are brittle splices and necking. Both these issues can be solved by adjusting the Heat and Cooling Factor.
-
Note that each increment of 1 in your Heat and Cooling Factor value adds an additional half second to the heating and cooling time.
-
Brittle splices - This occurs when the filament is weak at the point of the splice. When applying a small amount of pressure, the splice snaps or breaks apart. A strong splice is malleable and can bend and act as if it were a single strand of filament without issue.
-
If you’re experiencing brittle splices, increase the Heat Factor by one unit at a time testing the splice after each increase. For every increase of 1 heat you should also increase cooling by 1 increment to counteract this.
-
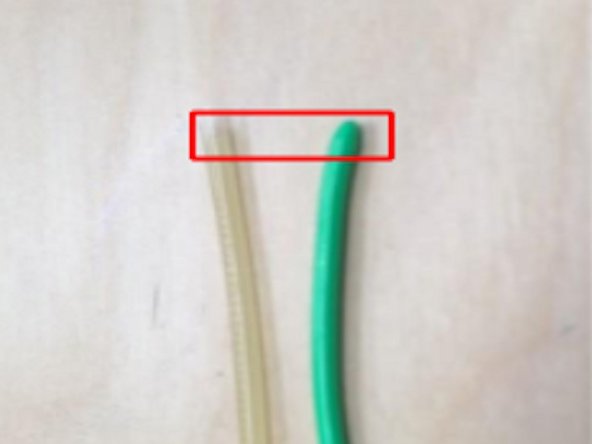
Necking splices - This occurs when splices are heated for too long, causing splices to ‘neck’ and create a thin string-like center at the splice. Decrease the Heat Factor and increase the Cooling Factor to fix this issue.
-
Bulging splices - If a splice is too hot when it begins to move, it can cause a bulge. The front of the filament is pulled, but the splice does not move enough, and the back filament compresses into the splice.
-
To address this, either (1) if possible, lower the Compression Factor, or (2) slightly increase the Cooling Factor so the splice has more time to solidify.
-
-
-
The Compression Factor adjusts the distance the two filament ends are compressed into each other. If the filaments are compressed too much or too little, it can negatively affect splice quality.
-
If the Compression Factor is set too low, you will see a small penetration cone in the splice.
-
Increase the Compression Factor to create a larger penetration cone, which will help with splice quality.
-
Alternatively, having too much compression can affect splice quality negatively as well, as Palette 2 will try to force the compression of the filament together. Often, users will hear a skipping sound from the motors if their compression value is too high.
-
Skipping will weaken the bond between the two filaments as it will cause the filaments to separate. If you hear Palette 2’s ingoing drives skipping or grinding away at filament when splicing, decrease the Compression Factor by 1 at a time to reduce this.
-
-
-
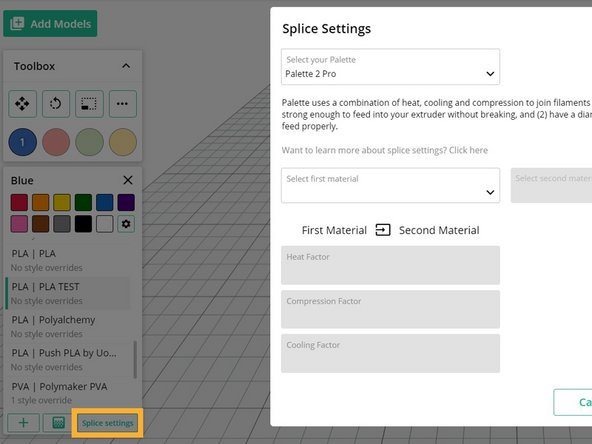
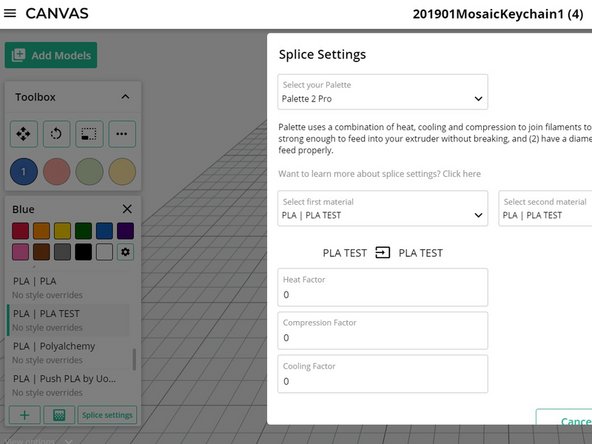
To use the Heat, Compression, and Cooling Factors found during splice tuning, open your project, and select a color swatch or input drive.
-
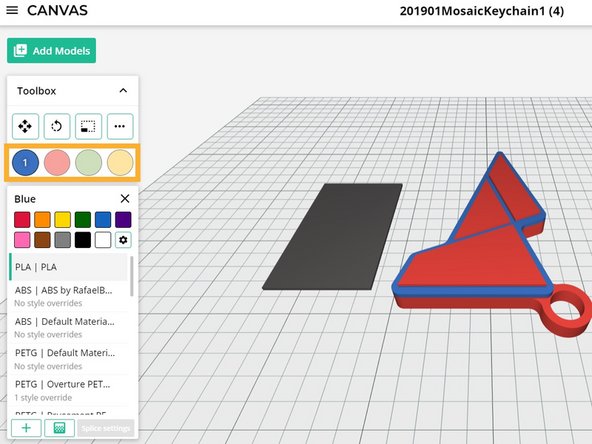
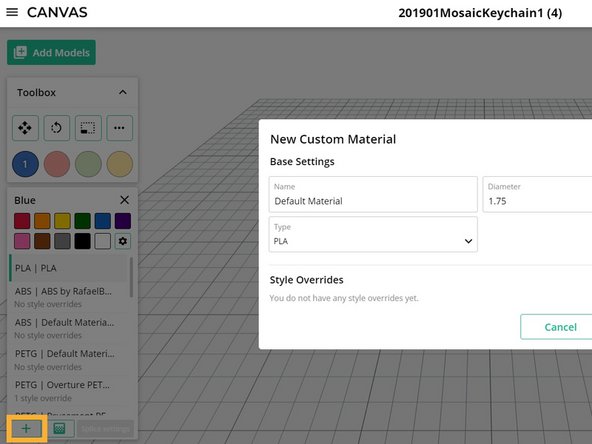
If you already have a material profile created, proceed to the next step. If you would like to create a new material profile, click the Add New Material button on the bottom left of the colors and materials toolbox. You may edit the name of the material and the material type.
-
Once your materials are created, select the material profile and click the Splice Settings button on the bottom right. You’ll be able to select your materials and enter the Splice Tuning values in the following window.
-
-
-
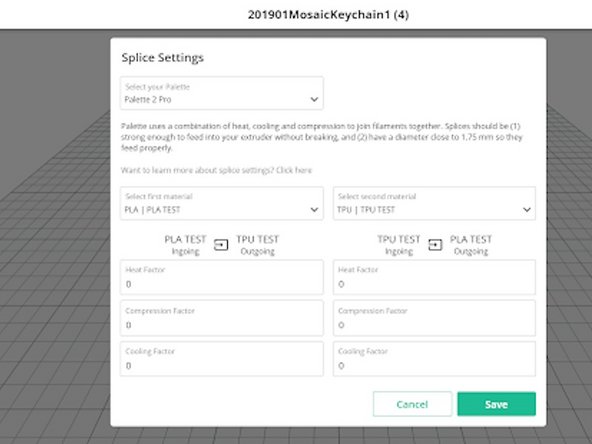
If the First and Second Material are the same (ex. PLA - PLA), the Heat, Compression, and Cooling factors will be the same regardless of which material is fed into Palette first. Only one set of values will be needed.
-
If the First and Second Material are different materials (ex. PLA - TPU), the Heat, Compression, and Cooling factors would differ depending on which material is the “pushed” (ingoing) filament versus the “standstill” (outgoing) filament. Because of this difference, the user will need to set values for both situations individually.
-
When setting the Heat, Compression, and Cooling values, the ‘outgoing’ filament is being heated at a standstill while the ‘ingoing’ filament is being pushed into the molten filament, compressed, and cooled to create a splice. Once one combination has been tested, swap the filaments in drive 1 and drive 2 to test for the second scenario.
-
Once your Splice Settings are set, select Save to have these settings applied to your project and future splices.
-
-
-
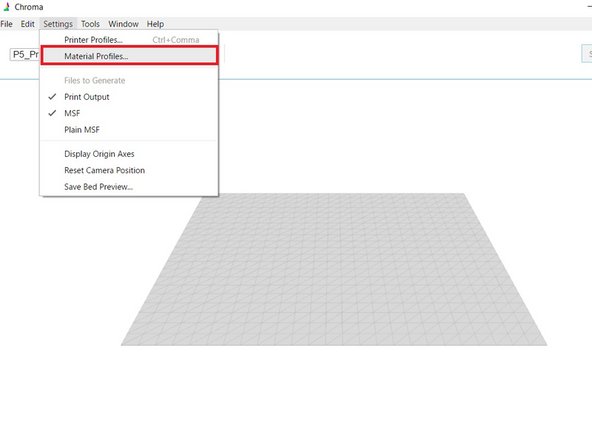
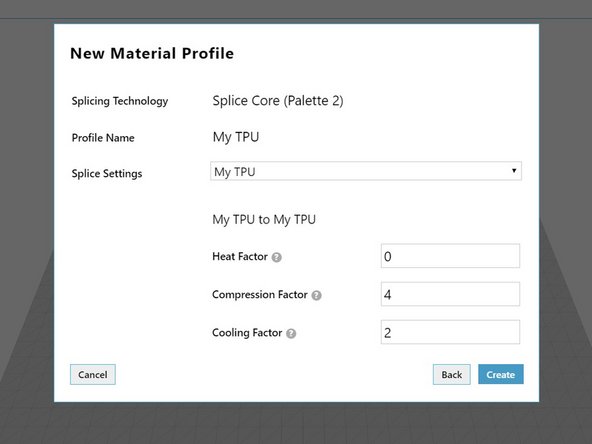
To use the Heat, Compression, and Cooling Factors found during Splice Tuning, open your Material Profiles in Chroma by selecting Profiles > Material Profiles.
-
On the following screen, select New Profile. Ensure that you’ve selected either ‘Splice Core (Palette 2)’ or ‘Splice Core Pro (Palette 2 Pro)’ as your Splicing Technology. Find the material profile you’d like to tune and hit Edit.
-
Several baseline Materials will be available to choose from, select the one closest to your material. Select a name for your material and hit Tune Settings.
-
-
-
On this screen, you’ll be able to select the combination of materials that you have tuned for. The default combination will be your new material spliced with itself, so only one set of Heat, Compression, and Cooling values is needed.
-
To tune for different materials, select another material under Splice Settings. You’ll notice that two sets of Splice Tuning fields will appear as values will differ depending on which material is the “pushed” (ingoing) filament versus the “standstill” (outgoing) filament.
-
Because of this difference, the user will need to set values for both situations individually. When setting the Heat, Compression, and Cooling values, keep in mind that the ‘outgoing’ filament is being heated at a standstill while the ‘ingoing’ filament is being pushed into the molten filament, compressed, and cooled to create a splice.
-
Once one combination has been tested, swap the filaments in drive 1 and drive 2 to test for the second scenario.
-
-
-
Solution 1: Check that the splicer is installed correctly and that the thumb screw is securing the splice core in place.
-
Solution 2: Check that the blue light on the splicer goes on during splicing. If it does not, please contact support@mosaicmfg.com.
-
-
-
Solution 1: If splices do not cool enough before passing through the outgoing drive, they can sometimes be pinched by the idler bearing. To solve this, increase the Cooling Factor by 1 - 2 units to add more cooling. You can also try running your Palette with the magnetic top casing removed. This will allow the system to run cooler.
-
-
-
Solution 1: This can sometimes be caused by having too high of a Compression Factor value. Try decreasing the Compression Factor by 1 and testing again.
-
Solution 2: This can sometimes be caused by a warn splice core Teflon tube. Under the Settings menu on Palette 2’s screen, click “About” and check the “SC Spliced”. If this is greater than 10,000, then your splice issues may be caused by a warn tube. In this case you can replace the tube by following these instructions.
-
Please note: once a tube is removed, it cannot be reinstalled.
-
-
-
Solution 1: This is usually caused by the filament not being cool enough when going through the drive motor. Try increasing the Cooling Factor by 1 or 2 units. You can also try running your Palette with the magnetic top casing removed. This will allow the system to run cooler.
-
Solution 2: This can be caused by using filament that is not rigid enough. Mosaic does not recommend using TPE materials and/or TPU materials that are very soft.
-
-
-
Solution 1: If a material that you are trying to splice with is not listed in the guidelines above then you will need to decide on an appropriate set of factors to start with. As a rule of thumb, try selecting a material in the list that is closest to the material you are using.
-
For example, if it is a new water soluble material, try selecting one of the other water soluble materials in the list. Or if it has a high extrusion temperature, try starting with the settings from another material in the list that has a similar extrusion temperature.
-
-
-
Solution 1: There can be times when the same settings that worked in Splice Tuning results in failed splices when used hundreds of time in the duration of a print. If a print does not complete based on an issue with splicing, you can usually apply your learnings to improve splicing in the future.
-
If the splice broke then you may consider increasing the Heat or Compression Factor. If the splice fails because of bulges, you may want to consider increasing the Cooling Factor or decreasing the Compression Factor.
-


If you have any questions, please contact us at support@mosaicmfg.com.
If you have any questions, please contact us at support@mosaicmfg.com.
Cancel: I did not complete this guide.
3 other people completed this guide.

2 Comments
Hello,
I set my splice on palette 3 pro and canvas and still at 43 min of printing. Printing stops with error 134.
The wire always breaks at the same minutes of printing. Sachany that I have already modified the file and adjusted the splices and nothing changes
Hello Amandine, what are your splice settings? Could you please send us a MAFX/MCFX file where this error occurs? Error 134 will trigger if the splice breaks, so we just need to make sure you're using the optimal settings and applying them correctly to your material profiles. If you can send this information to support@mosaicmfg.com, we can work together.
-
Hello Amanda, what are your splice tuning settings? Could you please send us a MAFX/MCFX file where this error occurs? The 134 error will trigger if the splice breaks, so we may just need to ensure that you're using optimal settings and that you're applying them to your material profiles properly. If you can send this information to support@mosaicmfg.com, we can work through this together.