
Parts
No parts specified.
-
-
Download and use a frequency app to test the sound of the belts while being strummed
-
XY belts - strum the middle of the belts that go along the very front of the printer
-
Z belt - strum the middle of the lowest belt that goes along the very back of the printer
-
Take care not to confuse the XY and Z belts. In the picture of the back of the printer, the Z belt is highlighted in yellow at the bottom.
-
The ideal frequency for XY belts should be around 80Hz, after some usage. Initial belt tension will be higher, in a new printer. The Z belt should be around 70-75Hz
-
Attempt to strum one belt at a time without touching the other.
-
-
-
Bring the Print Head to the front of the printer. To tighten/loosen the XY belts, look for the black belt tensioning blocks on the front left and right corners of the printer. Use the 3mm Hex key to loosen the bolt on the center U-block.
-
Loosen the bolt on the back of the block.
-
Moving the U-block towards the back of the printer will tighten or tension the belts, while moving it in the forwards direction will loosen the belts. Test the frequency again after each movement, and try to reduce/increase frequency by around 5hz at a time.
-
Adjust the U-blocks on both sides of the printer simultaneously as best as possible, to prevent skewing the gantry. Check that both the left and right Y-axis carriages are in contact with the tensioning blocks
-
Reposition the U-block to tension the belt, then tighten the back and top bolts to secure in place.
-
Test the sound of the belts again, checking that they're both within the acceptable frequency range, which is around 80Hz for the XY belts.
-
-
-
Tightening the Z-belt is not anticipated to be done on a regular basis. Print quality issues are more often addressed through XY tensioning in the previous step.
-
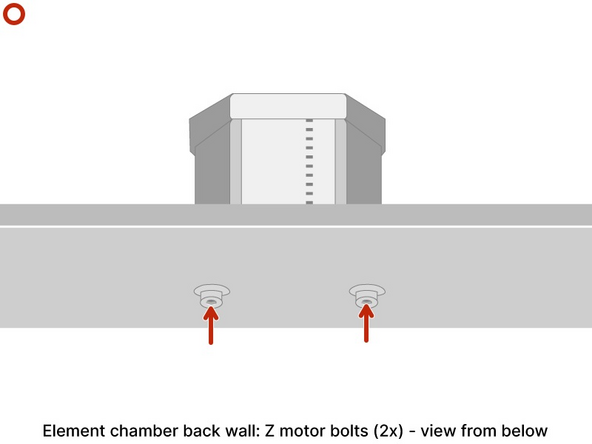
To tighten the back Z belt, first use a 2.5mm Hex key to loosen the bolts for the Z motor, which are below the XY plate
-
Then reposition the motor towards the left by tensioning this bolt, using a 3mm Hex key
-
Tighten the two bottom bolts for the Z motor again
-
Test the sound of the belt again, checking that they're within the acceptable frequency range, which is 70-75Hz for the Z belt.
-


If you have any additional questions, please send us a message at support@mosaicmfg.com
If you have any additional questions, please send us a message at support@mosaicmfg.com
Cancel: I did not complete this guide.
One other person completed this guide.

Team
