
Introduction
This article will provide instruction on how to use supports in your print when working within a project, and assumes you are already familiar with how to slice with CANVAS.
If you are going to use the same non-soluble material from the model as supports, please follow steps 1-2. For soluble supports, see steps 4-6. To create customs supports, see steps 7-9.
-
-
Upload and place model(s), and apply colours
-
In the Supports tab of your Project Settings, select the input drive you would like to use for the supports
-
Alternatively, choose Auto to allow any input drive to be used - this will reduce the number of transitions in your print
-
-
-
Density: high density will support smaller details better, while low density supports will be easier to remove and use less material
-
Maximum overhang: specify the maximum overhang angle that can be printed without support. 45 degrees is recommended as an upper limit for most printers
-
Support placement: specify the vertical and horizontal gaps from the model
-
Reinforcement layers: can improve the stability of tall support structures (KISSlicer only)
-
Click the "Slice" button to preview your supports
-
-
-
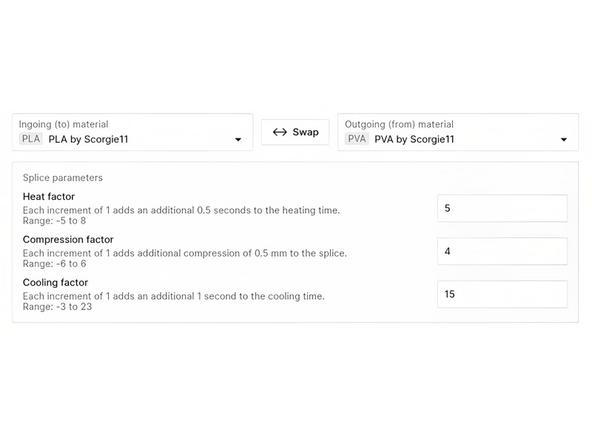
Before printing with soluble supports, please perform Splice Tuning for Palette 3 when splicing together the materials used in the print. Soluble materials will typically require high cooling times, and you'll need to experiment to get the best splices possible.
-
Create a new material profile for your soluble material, and apply your splice settings
-
These support structures are entirely soluble. This helps with finely detailed models where you want to preserve the surface quality of the print. After you finish printing, soak the print in some water and watch the soluble material dissolve away. You'll have a squeaky clean print!
-
-
-
Upload and place model(s).
-
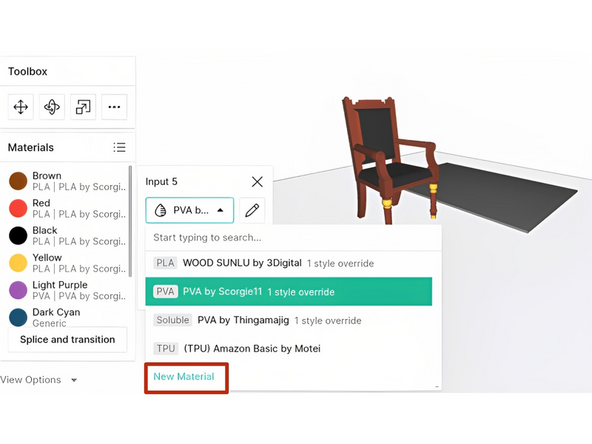
Click on the input drive that you would like to load the soluble filament into. Select your soluble material profile
-
You can also add a new material profile here, if you haven't yet created it
-
-
-
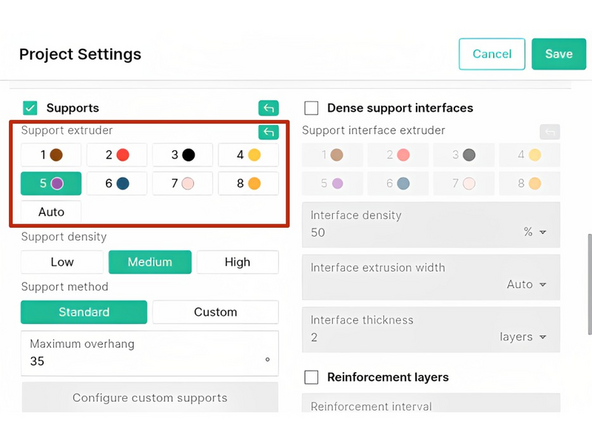
In the Supports tab of your Project Settings, under Support extruder, select the input drive for the soluble filament. This will use soluble filament for the entirety of the support structure
-
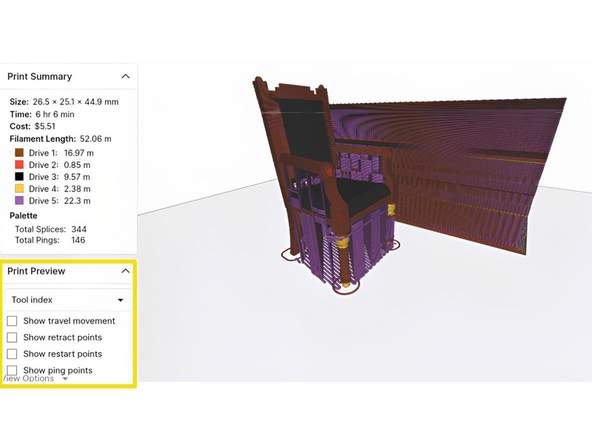
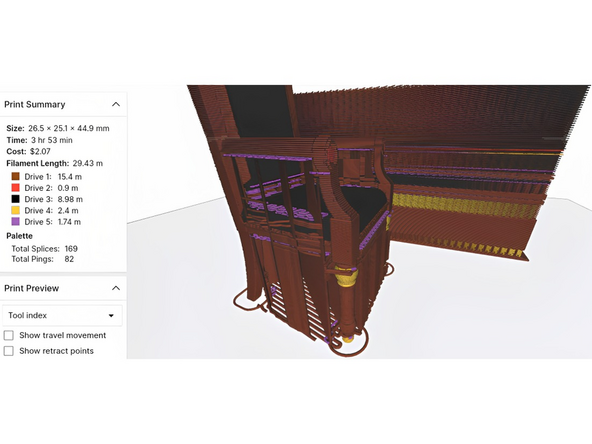
Click the "Slice" button to preview the different tool indexes. Here you can see the different input drives used, where PLA will be loaded into Drives 1-4 and soluble material (PVA in this case) will be loaded into Drive 5
-
-
-
These support structures are composed of non-soluble filament with a layer of soluble material to help separate support from model. This helps reduce waste of soluble filament.
-
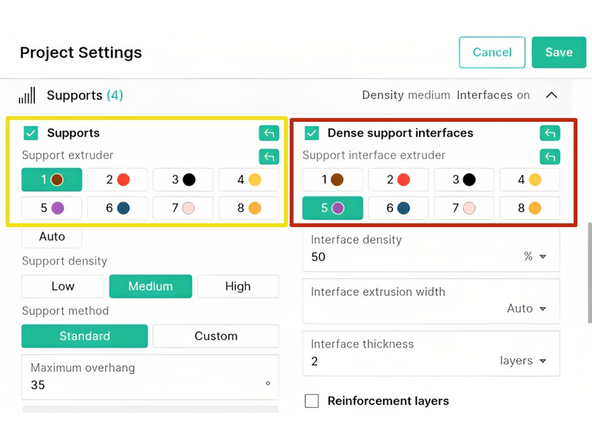
Under the Supports tab of your Project Settings, enable Dense support interfaces. Select the drive that you're using for the soluble material.
-
Then, under the regular Supports setting on the left, select one of the drives you're using for PLA. The rest of the supports will be printed using this.
-
You can specify density, extrusion width and thickness of the soluble interfaces
-
Click the "Slice" button to preview the different tool indexes. Here you can see where the soluble interfaces are placed between the main supports and the part (in this picture, the soluble interfaces are purple)
-
-
-
Areas where supports are required can be painted directly onto the model. Custom supports can also be auto-generated throughout the model or from the build plate only.
-
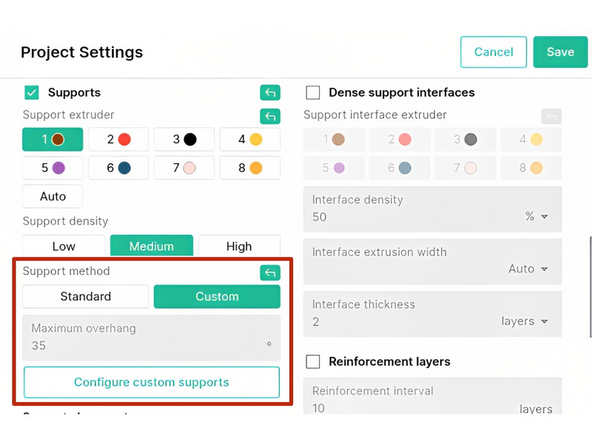
In the Supports tab of your Project Settings, under Support method, choose Custom, then click on Configure customs supports. Remember to select the input drive that you would like to use for support material.
-
You will now be taken to the Custom Supports View. From here, you have more options for the model as to where you would like supports to be generated.
-
-
-
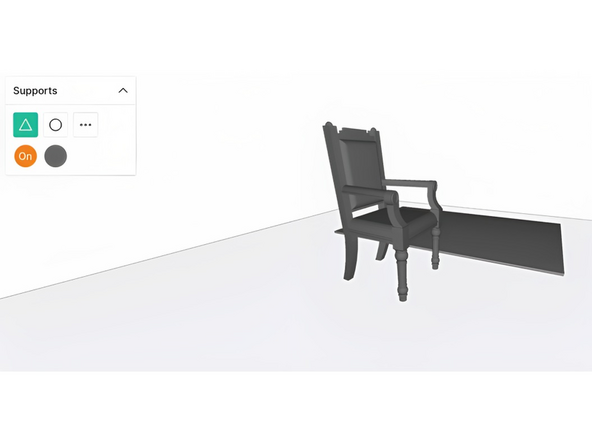
With the support tool on and using the facet or sphere tool, paint the model where you would like supports to be generated. Each painted region will generate supports vertically. With the tool off you may erase painted regions.
-
-
-
Click on the 'More' options (three ellipses) to auto-generate the supports. Please note that if you painted supports previously, they will be cleared if you auto-generate. Enter a maximum overhang angle that supports will be auto-generated for. 45° should work fine for most printers.
-
When you auto-generate any part of the model matching this angle will have a support created underneath it. If you select from build plate only, only faces of the model directly above the bed will have supports generated.
-
-
-
From the 'More' options, you can turn the preview on or off. When painting supports or generating them, you can preview where the supports will be.
-
Click Save and Return to go back to the project view.
-


If you have any questions, please send a message to us at support@mosaicmfg.com.
If you have any questions, please send a message to us at support@mosaicmfg.com.
Cancel: I did not complete this guide.
5 other people completed this guide.
