Introduction
Canvas Hub streamlines your 3D printing process by providing wireless connectivity between your printer, Palette 2, and printer. Your G-Code and settings are now accessible across your devices.
Video Overview
-
-
-
If you are using CANVAS Hub S, the image zip file is found here.
-
Please download and extract the zip folder.
-
Update 11.29.2021: The image files above have been updated for Python 3. When launching Octoprint for the first time, a new Octoprint user account will have to be created. Upon launching Octoprint for the first time you may also see a server error, please wait for about 5-7 minutes to allow it to start.
-
-
-
Disconnect the power cable from your CANVAS Hub and open it up by inserting a flat head screwdriver under the lip of the lid and prying the top lid off.
-
Gently lift the PCB out of the enclosure.
-
Flip over the board and remove the SD Card.
-
-
-
Insert the microSD card into your computer. An adapter may be necessary.
-
-
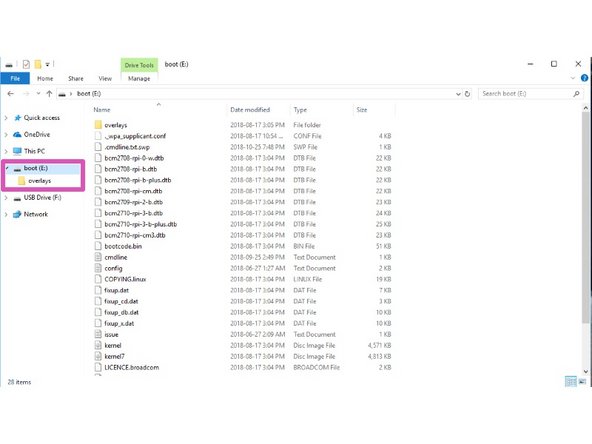
Verify which drive your microSD is present on (in this example, our SD card is on the E: drive).
-
-
-
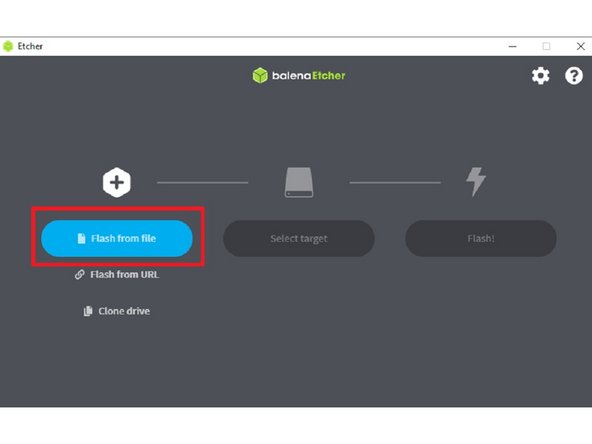
Open balenaEtcher, and click 'Flash from file'. Load the image zip file.
-
Once loaded, Etcher should automatically select the drive for your SD card.
-
Select 'Flash!'. The process should take a few minutes to write onto your SD card.
-
Reassemble your CANVAS Hub and follow the guide for setting up your CANVAS Hub. Please note that your new web address is 'ABCD-CH-canvas-hub.local/'.
-
-
-
Find a spot to setup your Canvas Hub. We recommend positioning your Hub closer to a router if your printer setup permits it and ensuring that the USB cable connected to your printer is long enough to reach the Hub without getting in the way of any of your printer axes during movement.
-
Connect your power supply to the outlet and Canvas Hub. Check that your indicator light turns on. Once connected, please wait approximately 3 minutes to initialize and set up an access point to connect.
-
We recommend waiting for the entire 3 minute duration as trying to access your Canvas Hub interface too early can cause it to reset and prolong the process of getting itself setup.
-
-
-
Locate your Canvas Hub serial number. This can be found on the bottom of your Canvas Hub unit or on the lid of the packaging box. The serial number has the format of XXXX-XX and is not case sensitive. In this case, the serial number is '0ALX-CH'.
-
If the Canvas Hub has been factory reset, the new serial number will be abcd-ch
-
Once your unit has been plugged into the power for 3 minutes, you'll be able to connect your Canvas Hub to its internal website.
-
-
-
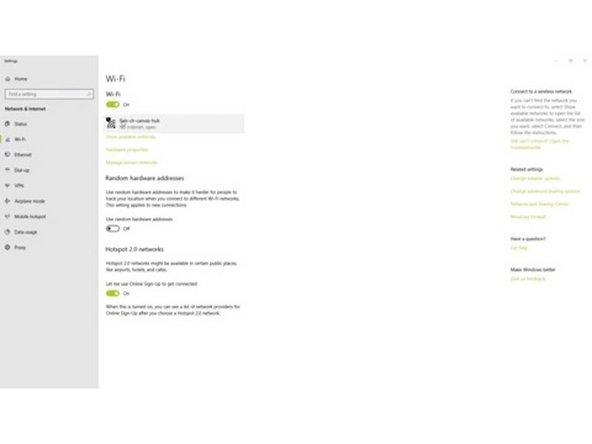
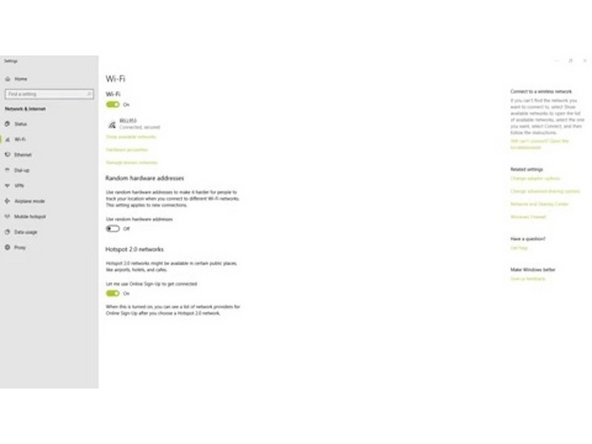
At this point, your Canvas Hub is broadcasting its own network that can be located on your WiFi networks. The name for this network will be the same as your serial number with the format 'XXXX-XX-canvas-hub'. In our example, the network is called '0ALX-ch-canvas-hub' or 'abcd-ch-canvas-hub'. Connect to your Canvas Hub's hotspot.
-
Even if you are connected to the Canvas Hub's WiFi, it may indicate a status of 'No Internet'; this is normal.
-
-
-
Once connected to the hub's network, locate the unique web page for your Canvas Hub unit. Similar to the network name, insert your serial number with the format 'XXXX-XX-canvas-hub.local/' into the browser of your choice.
-
In our example, this would be '0ALX-CH-canvas-hub.local/' or 'abcd-ch-canvas-hub.local/'
-
If this address does not connect, please enter the IP address '10.0.0.5/' into your browser.
-
Please use 'http://' at the beginning of the URL, and the forward slash ('/') at the end of the address. If you are unable to connect, please visit our troubleshooting.
-
-
-
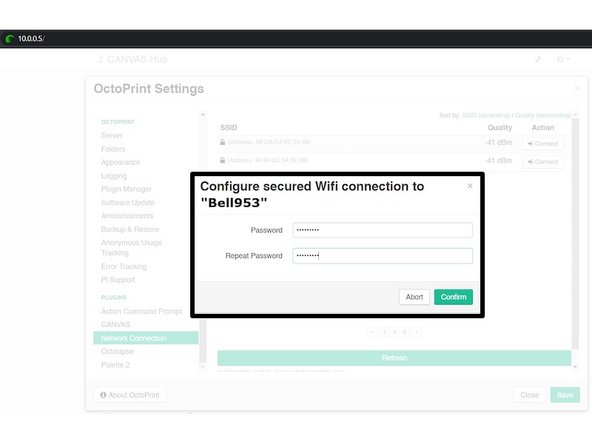
Now that you're connected to the Canvas Hub interface, you will connect Canvas Hub to your home network. Go to the Settings menu (wrench icon near the top of the screen) and select Network Connection on the left-side menu. Select the desired WiFi network and click Connect and input the password.
-
In our example, we've connected to network "BELL953". Canvas Hub will automatically restart itself after this selection to connect to the chosen network.
-
Canvas Hub will not appear on 5GHz networks, so ensure that you are using a network that is running on 2.4 GHz.
-
This can take anywhere between 3-5 minutes. If you are stuck on the 'Rebooting' screen for more than 5 minutes, please refresh the page on your browser.
-
-
-
Once Canvas Hub has connected to your home network, ensure that your computer has also reconnected to this network. For some users, your computer will reconnect automatically but for others, you may need to re-enter your credentials.
-
-
-
To allow uploading of your sliced files directly from Canvas, you will need to first connect your account to Canvas Hub. In Octoprint, go to the Canvas tab and click "Get activation code".
-
Visit canvas3d.io/connect to enter the activation code and link your Canvas account to Octoprint.
-
To remove a CANVAS Hub from your account, login to CANVAS and go to Devices.
-
-
-
Now that your Canvas Hub can talk wirelessly to your desktop computer, connect your Hub to your printer. Depending on your printer's USB slots, select the provided USB-B or micro-USB cable. Insert the USB-A side into any port of your Hub and the other end into your printer.
-
Once the cable is connected, connect your printer onto OctoPrint by selecting Connect on the main screen under Connection. The Connection tab will minimize once the printer is connected to CANVAS Hub. You'll also notice that the State will read Operational in the State tab.
-
-
-
Lastly, connect Palette 2 to Canvas Hub. Turn on Palette 2 using the power switch on Palette's side and connect the provided micro USB. Attach the other end to any USB port on the Canvas Hub.
-
Return to OctoPrint. Under the Palette 2 tab, select Connect to Palette 2 to complete the connection between your Palette 2 and Canvas Hub. When your Palette 2 successfully connects the Connection Status will change to 'Connected'.
-
-
-
If you're having issues with connecting your Palette and printer to your Hub, please try:
-
Unplug your Palette from the Hub.
-
With your printer connected and powered on, attempt to connect to your printer via OctoPrint by manually selecting the serial port instead of the AUTO selection.
-
There should only be ~2 options to select from, so if one does not work, please attempt the other options until you successfully connect.
-
Once connected, plug your Palette back into the Hub and connect on the OctoPrint interface.
-
If you're still running into issues, please visit our page here.
-
-
-
Your Canvas Hub is now ready to go! Visit canvas3d.io to slice your first project to calibrate Palette with your printer. Please also continue with Palette 2 connected printing instructions.
-
If you have any additional questions, please send us a message at support@mosaicmfg.com.
If you have any additional questions, please send us a message at support@mosaicmfg.com.
Cancel: I did not complete this guide.
6 other people completed this guide.


