
Introduction
Before you continue with this setup guide, please refer to Chroma's built-in setup walkthrough wizard. Get Chroma here.
Palette/Palette+ can enable your Series 1 printer to do two kinds of prints: layered prints and prints with precise color changes.
The Quick Start Guide included with your Palette explains how to start a layered print, and these steps will help you get started with your first print with precise color changes.
If you have another 3D printer, please refer to our general setup guide.
-
-
Positioning is really important! Positioning Palette or the Scroll Wheel incorrectly can result in weak splices and failed prints.
-
The Scroll Wheel comes pre-assembled for your Series 1 printer and uses a longer PTFE tube to connect to your printer's extruder. The Series 1 also comes with a custom PTFE tube clip for your Palette, and can be easily installed onto your printer's extruder. Once this is done, clip your Scroll Wheel's PTFE tube into the PTFE tube clip.
-
If you'd like to print out another PTFE tube clip, you can find it here. Keep the tube clipped in. Find a spot for the Scroll Wheel that allows your extruder to move freely to each corner of the bed without excessively bending the PTFE tube.
-
Depending on how your printer is set up, the PTFE tube clip may not hit the limit switch. To fix this, simply loosen the two screws holding the limit switch and push the unit towards your extruder before re-fastening. We also have a Scroll Wheel mount (found here) if you would like to experiment with other position placements.
-
Once you've found the right spot, find a square of Velcro in your Palette Tool Kit. Use this Velcro to secure the Scroll Wheel in place.
-
-
-
Palette and the Scroll Wheel must be positioned close enough together so that the tube with the magnet can touch Palette, but far enough apart so that the magnet can travel at least 15 cm.
-
During prints, the buffer will expand and contract; the magnet will move back and forth. The magnet will hover around 15 cm away from Palette, and will periodically return to Palette before being pushed back out again.
-
Make sure filament does not bend too much when coming out of Palette and when travelling through the PTFE tubes. To do this, you may consider re-positioning or slightly rotating your Scroll Wheel or Palette. This will help ensure that the splices are strong. Bending the tubes too much can weaken (and in some cases, break) them.
-
You can see that there are no extreme bends in the tubes, and there is enough space for the 15 cm of buffer space. You'll also see that we elevated Palette in order to allow for this space. If you're experiencing weak or broken splices during prints, try to run Palette in Splice Demo > Without Printer mode.
-
This mode will create splices without the Scroll Wheel and printer. If splices created using the Splice Demo > Without Printer mode are strong, then you may need to re-position your Scroll Wheel and printer. If you're still experiencing bad splices, please contact us.
-
-
-
Chroma will help you through Steps 3 to 5, but continue on with the Online Setup Guide if you need additional assistance.
-
Please watch this video before continuing with step 3.
-
Download Chroma and install it on your computer, and start the program.
-
From here, select your Type A printer and model. You'll be brought to the Printer-to-Palette Calibration Walkthrough. This step-by-step process is easy to follow, and will help you find the values to input into Chroma to complete calibration. Make sure to keep note of the Loading Offset value and the Print Value!
-
You can download the calibration file here.
-
-
-
To get started, you'll need something to slice! You can model your own, or you can find multi-filament prints at the Multi-Filament Thingiverse group. Each different color/filament requires a different body.
-
Then, you'll slice your object. Currently, Chroma is compatible with GCode from Simplify3D and Cura 15.x. We also have videos explaining how to slice with your preferred slicer:
-
-
-
-
-
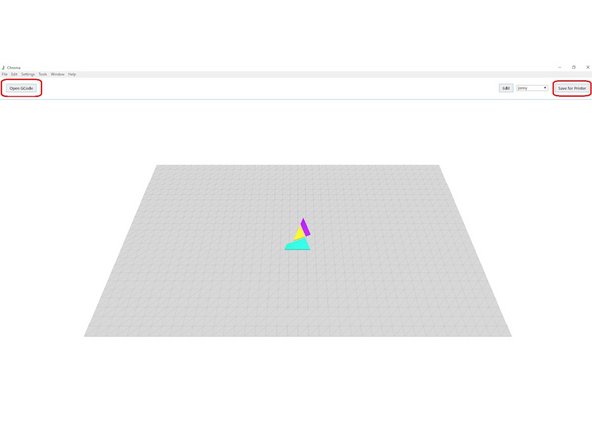
Once your slicer is set, slice your model and save the GCode file. Import this GCode into Chroma by clicking Load Print on the main window. This will create a preview of your model within Chroma. From here, click the Save for Printer button, and Chroma will then create two files:
-
1. A .MSF file to be loaded into an SD card for your Palette
-
2. A new GCode file to be loaded into an SD card for your printer
-
Once you have the SD cards placed inside your Palette and printer, you can begin the printing process! Ensure that your Palette is not connected via USB, and plug in the power supply to turn on your Palette.
-
-
-
Ensure Palette is not connected via USB. Turn Palette on by plugging in its power supply.
-
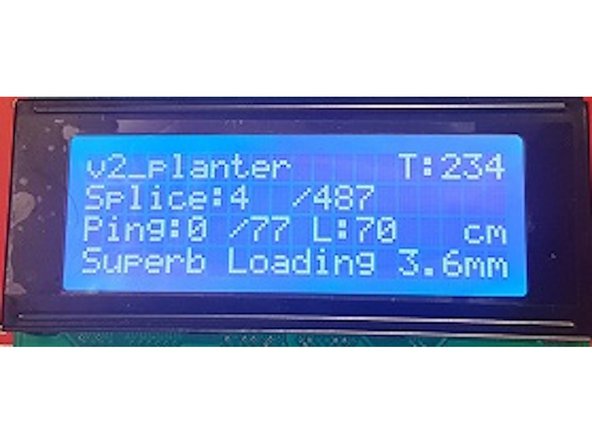
Select Multi-Color on the Palette menu, which will then ask for you to load your filament. Select your .MSF file. Palette will begin to make filament.
-
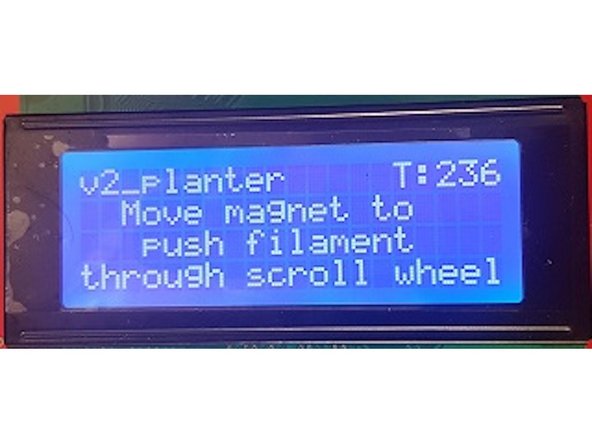
After a short time, Palette will ask for you to push the magnet towards your Palette. You'll notice that this action causes filament to move through your Teflon tube towards your Scroll Wheel.
-
Once you press the magnet against your Palette, release, and Palette will continue to produce filament.
-
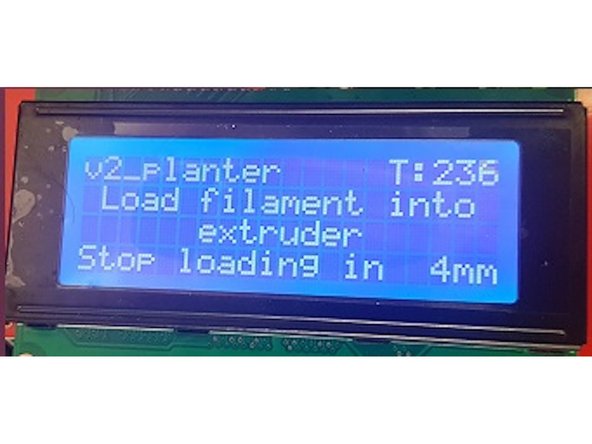
Continue steps 3 & 4 until the filament has passed through your Scroll Wheel and reached your extruder. You can now begin to carefully load the filament into your extruder and carefully lock the feeding tube in your Teflon tube clip.
-
On Palette's screen, you'll see a countdown, which advises you how many mm should be fed into your extruder. Depending on your printer, extrude enough filament to be as close to 0 mm as possible.
-
For example, with Type A printers, you can extrude a specific amount of filament using their online interface. Makerbot Rep 2's allow for manual loading on the printer's screen. Don't worry, even if you're a few mm off, your print should be fine!
-
Once this is done, Palette will beep, meaning that it is ready to print! Once you've reached this step, it's as simple as starting your print as you normally would, and Palette will continue to create filament as the print progresses.
-


If you have any questions, please contact us at support@mosaicmfg.com.
If you have any questions, please contact us at support@mosaicmfg.com.
Cancel: I did not complete this guide.
One other person completed this guide.
