
Introduction
In this guide you will learn how to:
- Access and print with gradient mode
-
-
Before utilizing custom print modes, ensure that your filament has been splice tuned. The Splice Tuning feature will help you find the ideal settings so your Palette 3 can create optimal splices. A guide on how to do this can be found here.
-
Slice a single-body STL file in Canvas or a slicer of your choice. Record the total print length, and transfer the file to the printer.
-
On Palette's main screen, tap Print From > Custom Print > Gradient Mode
-
-
-
Choose the inputs to use for the print.
-
Select the minimum and maximum length of your print. Load your GCode file into http://gcode.ws to determine filament length of your print.
-
Minimum Length: When your model is loaded, under Layer Info locate the layer that uses the most filament by layer (mm). Enter that value into the Minimum Length.
-
For smoother transitions if the model is in vase mode, use the filament used by layer amount from the walls of the print.
-
Note: Palette's minimum splice length is 8 cm.
-
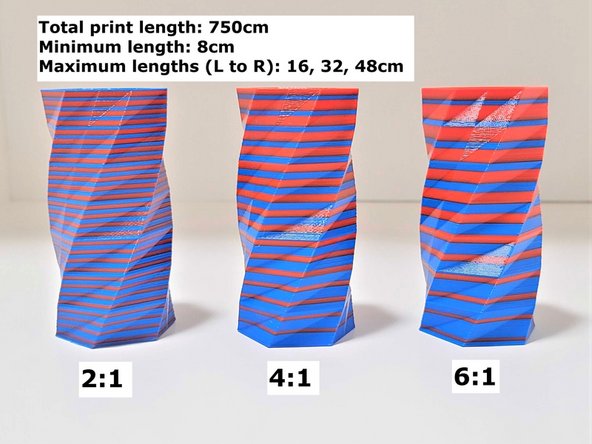
Maximum Length: Input the maximum length as a ratio of the minimum length (max:min). This creates variation on the smoothness of the gradient.
-
Ex: If you want a ratio of 4:1 (4 layers of the first filament and 1 of the second), multiply the Min Length of the filament by 4 to obtain the value of the Max Length.
-
If you prefer smoother or more distinct colour changes, try increasing this ratio to 6:1 or 8:1.
-
-
-
Enter the total length of the model in centimeters. The Canvas print preview will display the total filament length for the print, which can be converted to centimeters.
-
Follow the prompts displayed on Palette's screen to begin the print.
-
-
-
Follow Palette's instructions to load the filament.
-
Once Palette is finished making the initial splices with enough filament to come out of the outgoing tube, insert this filament into the printer's extruder.
-
Jog the filament until you see filament come out of the nozzle (just enough to prime it), and then start the G-Code file on the printer.
-


If you have any additional questions, please send us a message at support@mosaicmfg.com!
If you have any additional questions, please send us a message at support@mosaicmfg.com!
Cancel: I did not complete this guide.
3 other people completed this guide.
