With the following steps, we will be constraining the filament path found within your hot-end to ensure smooth movement and operation of 1.75mm filament.
a) For the UM 3 or UM 3 EXT, using the Ultimaker menu, heat up the hotend by selecting Material/Printcore > Material 1 > Move.
For the UM S3 or S5, please heat up the hotend by selecting Printer icon > No material > 3 Dot Icon > Move.
b) Caution: this next step will require you to interact with your unsecured hotend please make sure you do not directly touch the hot region of the hotend. Once the temperature reports a reading of 200C, pinch the print tab and pull the print core out of the printer. Hold the print core in the upper section near the clear tab that you pinch to pull it out. The printer may report a 'Max temp. Error…'. Please ignore this and continue with the installation.

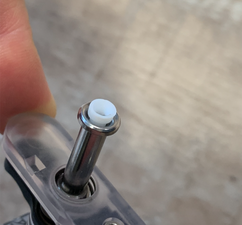
c) Carefully slide and press the Teflon sleeve into the print core taking care not to apply excessive force. While pressing the tube into place please exercise caution as you may have molten filament press out of the nozzle. If you find you are unable to fully seat the Teflon sleeve as shown in the photo below please perform a cold pull and repeat this step.


d) Replace the print core back into the print head of the printer. You may notice that slightly more force is required to press the print core into the print head with the new Teflon sleeve installed. Never apply excessive force to install the print core as this could damage the printer or print core. If too much force is required, this is likely because the sleeve has not been installed deep enough into the print core - the top head of the installed sleeve should be flush with the opening of the print core such that it cannot be pressed down any further (see photos above).
