
-
-
Before starting, please review the printing process overview.
-
-
-
The following slicers are compatible for printing with Palette+. Before starting to print in multicolor, four toolheads/extruders would have to be added to the printer profile to account for the four filament input drives on Palette+: Simplify3D, Cura, KISSlicer, Slic3r/PrusaSlicer.
-
Load STL files into slicer. Assign toolheads/extruders to each STL to indicate it will be printed as a different color. Position and arrange STLs and modify print settings. In this example using Simplify3D, since we are only printing with two colors, we have two distinct toolheads.
-
Save GCode file.
-
-
-
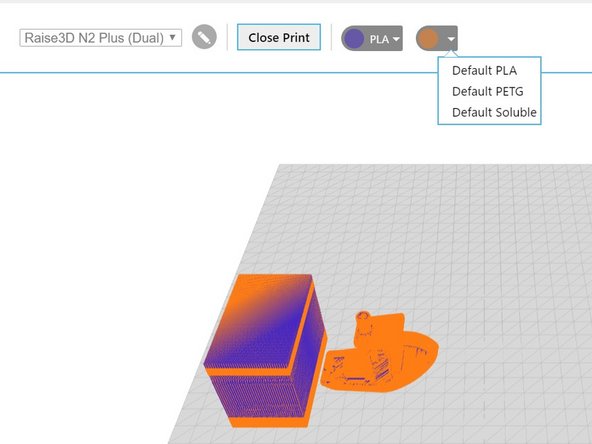
Launch Chroma and select the active printer profile. Load GCode saved from slicer. Assign colors/materials to drive inputs (the first color selector is for drive 1, second color selector is drive 2, etc.). Clicking the colored circle will allow color to be selected, and the dropdown arrow will allow material profiles to be selected for that drive.
-
Learn more about configuring material profiles: Splice Tuning. Learn more about combining filaments: Multimaterial Guide.
-
Click the button 'Save for Printer.' Transfer the MSF file to the SD for the Palette+, and the modified G-Code file can be transferred to the printer via USB, microSD/SD, or Wi-Fi.
-
-
-
Place filament in spool holder and positioned near the front of Palette+ for easy loading. Make sure the filament isn't tangled and is in a position that allows it to be fed easily with little friction.
-
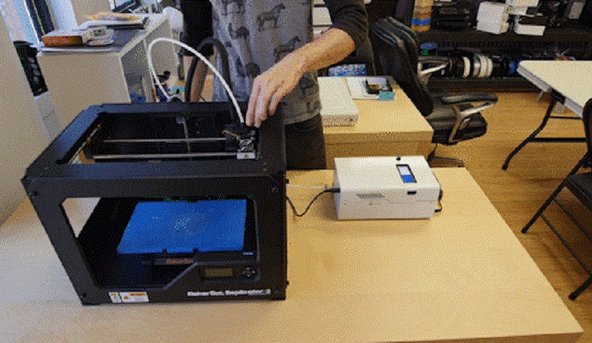
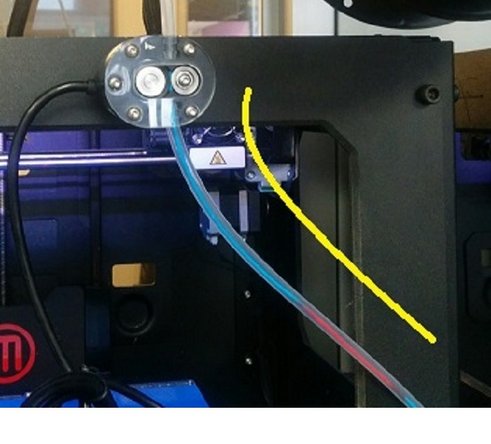
Plug scroll wheel into Palette+ and position on printer's frame. The scroll wheel's placement should allow the extruder to reach the entire print area without creating any sharp bends in the tubing.
-
If the provided Teflon tube clip isn't optimal for your setup, visit our Resources for custom scroll mounts and tube clip holders.
-
-
-
Power supply is plugged into Palette+ and outlet. Make sure the blue light on the power supply is on.
-
Palette+ SD card is inserted, modified GCode file is loaded into printer.
-
Ensure that Palette+'s tubing and printer's extruder are clear of any leftover filament. Check that there are no sharp bends in the tube and that the magnet on the scroll wheel tube can move freely back and forth from Palette+ (~15 cm).
-
Preheat print bed and extruder.
-
Enable Logging on Palette+. On the Palette+ screen, go to Preferences > Logging > On. This will automatically save ping/pong logs onto Palette+'s SD card after each print and provides a snapshot of your calibration values. Learn more about Pings, Pongs and our Calibration process. Learn more about how we use these values to Perfect Calibration.
-
-
-
Start MSF file from Palette+'s Multicolor menu.
-
Follow on-screen instructions to load filament into input drives.
-
Hold magnet against Palette+ to make filament as it passes through the scroll wheel. The scroll wheel can be rotated on an angle to allow filament to pass through easier.
-
Once the filament exits approximately 6-8 cm from the scroll wheel exit tube, load this into the printer's filament feed. Clip the Teflon tube into the tube clip once filament is loaded. Following the instructions on the Palette+ screen, continue to load filament and stop loading as the countdown approaches 0 mm.
-
It's acceptable to be off by a few millimetres. Confirm loading is complete on the Palette+ menu by pressing the screen dial.
-
Start the print from the printer's controls.
-


If you have any additional questions, please send us a message at support@mosaicmfg.com
If you have any additional questions, please send us a message at support@mosaicmfg.com
