
Introduction
This article will help users add additional extruders to Cura (v2.0 - 3.3) in order to slice for Palette. To learn how to set up Cura V15.x.x for Palette, please see this tutorial.
Video Overview
-
-
If you already have a printer profile in Cura, open this profile's machine settings (Settings > Printer > Manage Printers > Machine Settings).
-
Copy your Start and End GCode to a document for later use if you see any in your settings.
-
Add a new printer (Settings > Printer > Add Printer).
-
Add a Custom FDM printer even if your printer is on the list. Even if you have an existing printer profile, there is currently no way to copy a machine and add extruders in Cura.
-
Fill in your printer's information, including dimensions and settings. Set the number of extruders to 4 and the diameter to 1.75 mm.
-
-
-
Under the Extruder tab for each extruder, enter your nozzle diameter and ensure that the other fields are empty or 0 (including start and end GCode).
-
Click Finish to return to the home screen.
-
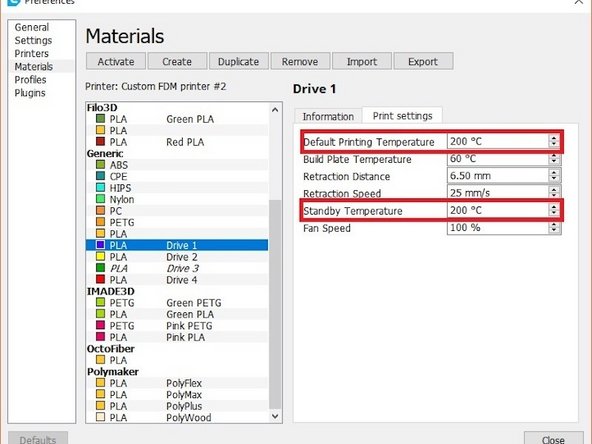
On Cura's main menu, go to Settings > Extruder 1 > Materials > Manage Materials. On this screen, select the material you would like to print with (ex. PLA) and create a Duplicate. Under the Information tab, update the name and assign different colours. This will help distinguish between extruders and profiles.
-
-
-
Under the Print Settings tab, set the Standby Temperature to be the same as the Default Printing Temperature. Repeat this steps for 4 different profiles (one for each extruder). Once updated, click Close to return to the home screen.
-
-
-
At the top of the right banner, you can assign each material profile to an extruder. Please ensure that all 4 profiles are the same for each extruder.
-
-
-
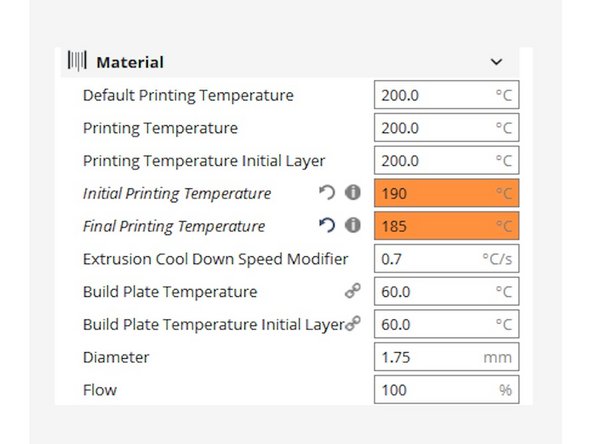
Set the Initial Printing Temperature and Final Printing Temperature to be the same as your Printing Temperature.
-
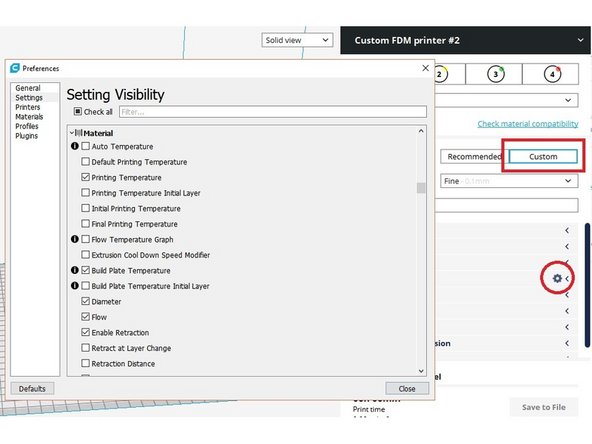
This is found on the right side of the home screen under Printer Setup, select Custom, which will expand a menu allowing you to change the profile settings. Hover over the Material tab on the home screen and you'll see a gear symbol appear. Clicking this will further expand the menu of customizable settings.
-
Ensure that Standby Temperature and Nozzle Switch Retraction Distance are also selected.
-
-
-
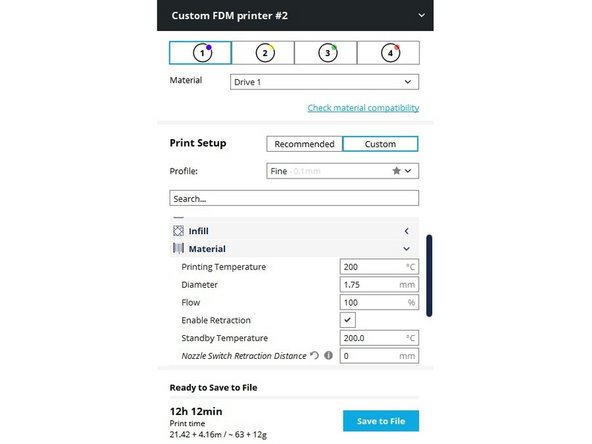
Back under the Material category, set the Printing Temperature and the Standby Temperature to be equal and set the Nozzle Switch Retraction Distance to 0. Repeat this for all 4 material profiles.
-
-
-
Now you're set to slice! When you load multiple STL files, you can assign an extruder for each file which will colour-coordinate with the material profile.
-
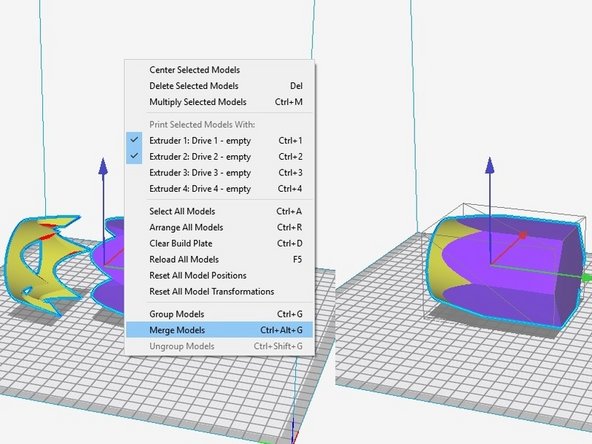
Do this by right-clicking an STL and selecting an extruder for it. Once all files are loaded and assigned, select all parts by holding the "Shift" key and clicking each part of the model, then right-click and select Merge Models.
-
Please ensure that all pieces are loaded and assigned to different extruders before merging, as you are unable to assign extruders once the model is merged.
-
-
-
For more recent versions of Cura (V3.4 on), we've seen issues with temperature changes in the GCode that causes the extruder to pause over prints, causing blobbing and quality issues. This is due to Cura adding a number of M109 commands that causes the extruder to pause as it heats and cools. To eliminate this issue, please follow these steps:
-
On your computer, find the path C:\Users\%user%\AppData\Roaming\cura\3.3\definition_changes\ “your printer”_settings.inst.cfg
-
Add “machine_nozzle_temp_enabled = False” to the [values] section. This disables Cura from overriding any temperatures changes in the GCode.
-
Add “M109 S200” to the startup GCode.
-
-
-
We've also seen that additional lines are included in the GCode that can cause issues with the nozzle temperature.
-
If you're using Cura 3.6 of newer, we would suggest using a program such as Notepad++ to Find and Replace lines that contain 'M104 T0 S0'. You'll need to delete these lines or they will cause your nozzle to cool to 0 degrees.
-
You can also check that the last colour to print is assigned to the first extruder, helping to avoid this issue in the GCode.
-
Cura versions newer than V3.4 may cause additional issues and may require you to downgrade to previous versions of Cura.
-


If you have any questions, please contact us at support@mosaicmfg.com.
If you have any questions, please contact us at support@mosaicmfg.com.
Cancel: I did not complete this guide.
4 other people completed this guide.
