
Introduction
Style profiles are preset slicer settings, which can be saved and used in projects.
You can add a style profile when you're setting up a printer profile for the first time, or after the printer profile has been created.
There are two methods of adding a style profile to a printer profile:
- Import styles from a different slicer
- Start a blank style profile
-
-
Importing a style profile will allow you to use settings from another slicer. It's one of the easiest ways to get slicing if you already have some tried and tested settings!
-
Go to Printer Profiles and double click the printer you want to add a new style profile to.
-
Click New Style Profile.
-
Click Import from a Different Slicer.
-
Upload your printer profile file.
-
Once you’ve uploaded the file, confirm that the printer settings are correct, and click Save.
-
-
-
A blank style profile will have no preset settings and will require you to enter and modify different parameters.
-
Go to Printer Profiles and double click the printer you want to add a new style profile to.
-
Click New Style Profile.
-
Click Start from Blank Profile.
-
Enter your profile name and enter desired settings, click Save.
-
-
-
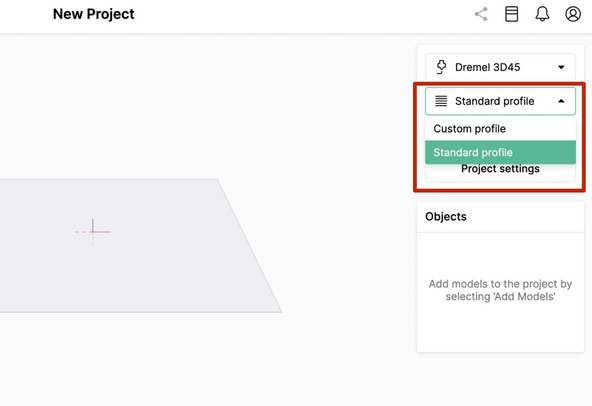
When creating a new project, select a style profile for the setup.
-
This will populate the project settings with preset slicer settings based on the style profile created in steps 1 and 2.
-
-
-
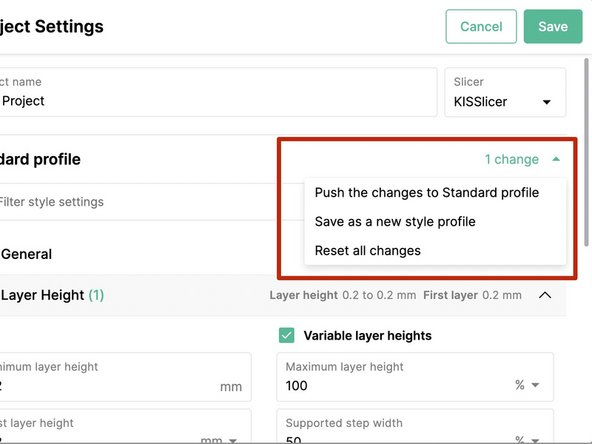
Slicer settings can be changed on a per project basis in Canvas.
-
When settings changed are made on a project, you can do the following to update or return to standard settings:
-
Push the changes to profile: The selected style profile will be updated with the project's settings.
-
Save as new style profile: The originally selected style profile will be unaffected, the project settings will create a new style profile for this printer.
-
Reset all changes: Project setting changes will be discarded, the original style profile will be used.
-
-
-
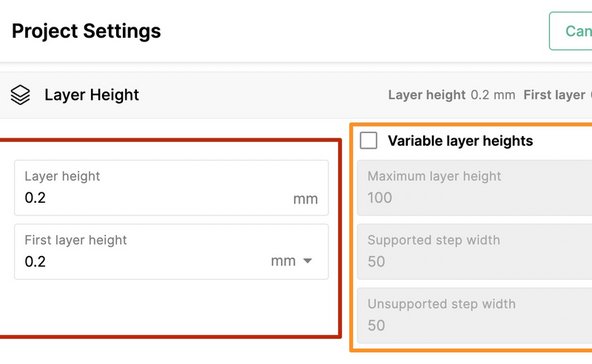
Layer Height: For printing with Palette, a layer height of 0.25 offers a good balance between detail and tower size.
-
Variable layer heights: This setting allows the slicer to automatically and smoothly change between an maximum and minimum layer height.
-
Extrusion Width and Multiplier: If extrusion lines are not adhering well, the extrusion width can be increased to 0.42-0.45mm. The extrusion multiplier can be adjust 2% at a time to adjust for over or under extrusion.
-
Gap Threshold for Holes in Print: Adding a gap fill can help generate toolpaths for areas that appear missing in the slice preview. Enter a number value to represent the millimeter length of the gap.
-
Retraction for Stringing: Increase retraction distance incrementally by 0.2mm, and retraction speed by 5mm/s at a time. This can be paired with slightly increasing movement speed under General settings.
-
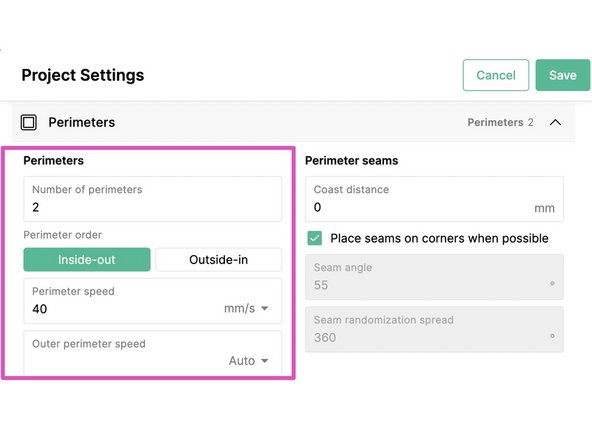
Perimeters for Surface Finish: Adding another perimeter can help with print strength, reducing the perimeter speed by 5mm/s at a time can help improve the surface quality.
-
-
-
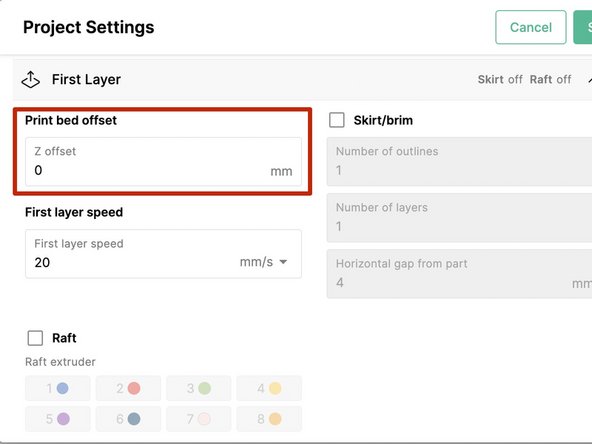
Print Bed Offset: If the z-offset calibration has been done for this printer, that z-height can be entered here (Note: please check the printer profile's start sequence to see if this is already included there). A z-offset that is too close to the bed will result in a print with low pings, which can affect the color calibration at print start.
-
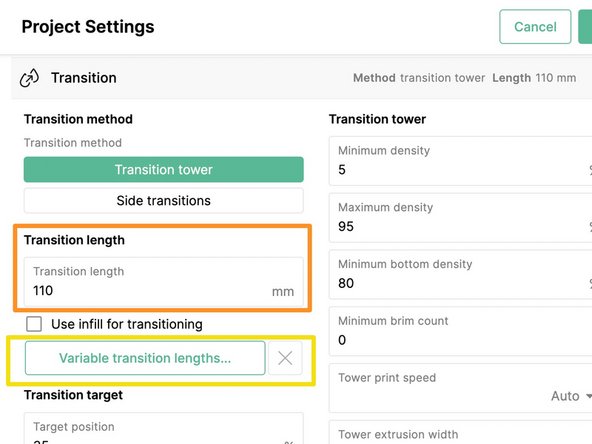
Transition Length: The transition length will determine the amount of filament extruded when transitioning from one color to another. Higher transition lengths can help reduce bleed, but will increase print times and transition tower size.
-
To learn about how transition lengths can be adjusted based on color strength, see Variable Transitions.
-
Transition Target: Specifies to what percent into a transition length the Palette should aim for the new color to reach the nozzle. Lower percentages will use more of the transition length for cleaning out the blended regions, with a well calibrated Palette and printer extruder.
-
Print Speed (Solid Layer in General, Infill Speed, Perimeter Speed): To help ensure Palette has sufficient filament in its buffer while printing, please avoid using very high speeds for these settings. A standard speed of 60mm/s can be used.
-


If you have any additional questions, please send us a message at support@mosaicmfg.com.
If you have any additional questions, please send us a message at support@mosaicmfg.com.
Cancel: I did not complete this guide.
2 other people completed this guide.
